Traditional Enterprise Application to the Azure Cloud, managed via Farmer
Introduction
This tutorial shows how to create the basic infrastructure of an enterprise application (for example, migrating old on-premises applications to the cloud) and then how to build the supporting services for that.
A traditional enterprise application has a database and a server. Farmer supports both Microsoft SQL Server and PostgreSQL. This tutorial uses the Microsoft version. For the server, we use a Virtual Machine (VM), which is basically your server in the cloud.
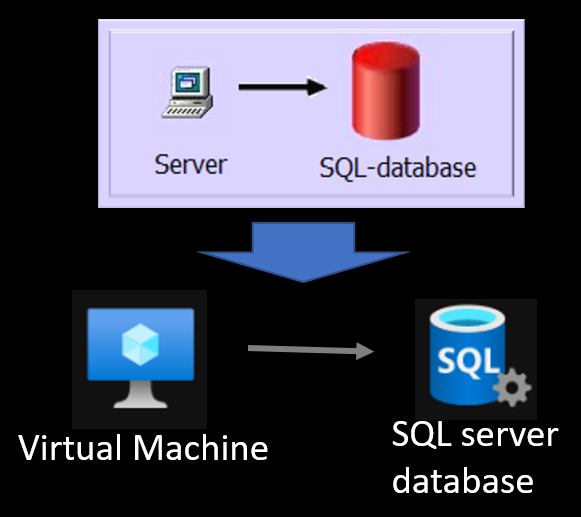
Virtual Machine and SQL Server
Creating the deployment template
First, we need a template project and a script for the deployment code. Create a new deployment application:
- Create a directory for your new application and enter it.
- Using the dotnet SDK, create a new console application:
dotnet new console -lang F#. - Install FAKE (which will be used to deploy the database) and Farmer:
dotnet add package Farmer
dotnet add package Fake.Sql.SqlPackage
dotnet add package Fake.DotNet.Cli
dotnet add package Fake.Core.Target
Then modify the Program.fs to have the following code:
open System
open Fake.Core
open Fake.Sql
open Farmer
open Farmer.Builders
open Farmer.TrafficManager
open Farmer.NetworkSecurity

let execContext = Context.FakeExecutionContext.Create false "build.fsx" [ ]
Context.setExecutionContext (Context.RuntimeContext.Fake execContext)

let runOrDefault args =
    try
        match args with
        | [| target |] -> Target.runOrDefault target
        | _ -> Target.runOrDefault "All"
        0
    with e ->
        printfn "%A" e
        1

let mutable dbConnectionString = "" // to transfer over Fake-tasks.

/// Create a Remote desktop file for the VM
let createRemoteDesktopFile machineName (ip:string) loginName =
    if ip.Contains "/" then Console.WriteLine $"Invalid ip: {ip}"
    else
    let content = $"full address:s:{ip}:3389\r\nusername:s:{machineName}\{loginName}\r\nprompt for credentials:i:1\r\nadministrative session:i:1"
    System.IO.File.WriteAllText(machineName + ".rdp", content)

/// Here we will insert the Farmer code to deploy infrastructure
Target.create "Infrastructure" (fun _ ->

    let deployEnvironment = "Test" // "Prod"
    let deployName = "TestResourceGroup"
    let deployLocation = Location.WestEurope
    let envInfo = deployEnvironment.ToLower()
    printfn $"Deploying {envInfo} {deployName} to {deployLocation}"

    // ---- < Azure SQL > ----------

    // Todo: Insert DB Server code

    // ---- </Azure SQL > ----------
    // ---- < Virtual Machines + NSG > ----------

    // Todo: Insert VM code

    // ---- </Virtual Machines + NSG > ----------

    // Todo: Insert Farmer deployment

    // Todo: More resources will follow here...
    ()
)

/// Here we will install the FAKE task to deploy the database to SQL Server
Target.create "DeployDatabase" (fun _ ->

    // Todo: Deploy database code
    ()
)

Target.create "All" (fun _ -> ())

open Fake.Core.TargetOperators

let dependencies = [
            "Infrastructure"
            ==> "DeployDatabase"
            ==> "All"
    ]

[<EntryPoint>]
let main args = runOrDefault args
Now, if you run dotnet build and dotnet run, you should see that both targets, Infrastructure and DeployDatabase, are being called.
Creating the database server with an empty database
Creating SQL Server database:
Replace // Todo: Insert DB Server code with:
    let dbServerName = "my-db-server321".ToLower()
    let databaseName = "my_database"
    let dbUsername = "ServerAdmin"
    let dbPasswordKey = $"password-for-{dbServerName}{envInfo}"
    let dbPassword = Environment.environVarOrFail $"db-password-{envInfo}"

    let getMyIp = (new System.Net.WebClient()).DownloadString("https://api.ipify.org");
    let sqlFirewallRules = // List of SQL firewall IPs to open:
        [ "Deployment_Farmer_Ip", getMyIp
          // "Office-ip-2021-09-03", "123.123.123.123"
        ]

    let database =
        sqlServer {
            name $"{dbServerName}{envInfo}"
            admin_username dbUsername
            enable_azure_firewall
            add_firewall_rules (sqlFirewallRules |> List.map(fun (name,ip) -> name,ip,ip))
            add_databases [
                sqlDb {
                    sku Sql.DtuSku.S1;
                    name $"{databaseName}{deployEnvironment}" } ]
        }
Youc could add
            geo_replicate({ DbSku = Some Sql.DtuSku.S1
                            // Some different from the primary location:
                            Location = Location.NorthEurope
                            NameSuffix = "-geo"})
… to geo-replicate the SQL Server database to have a backup on a different location.
Relevant Farmer API documentation:
Creating virtual machine(s)
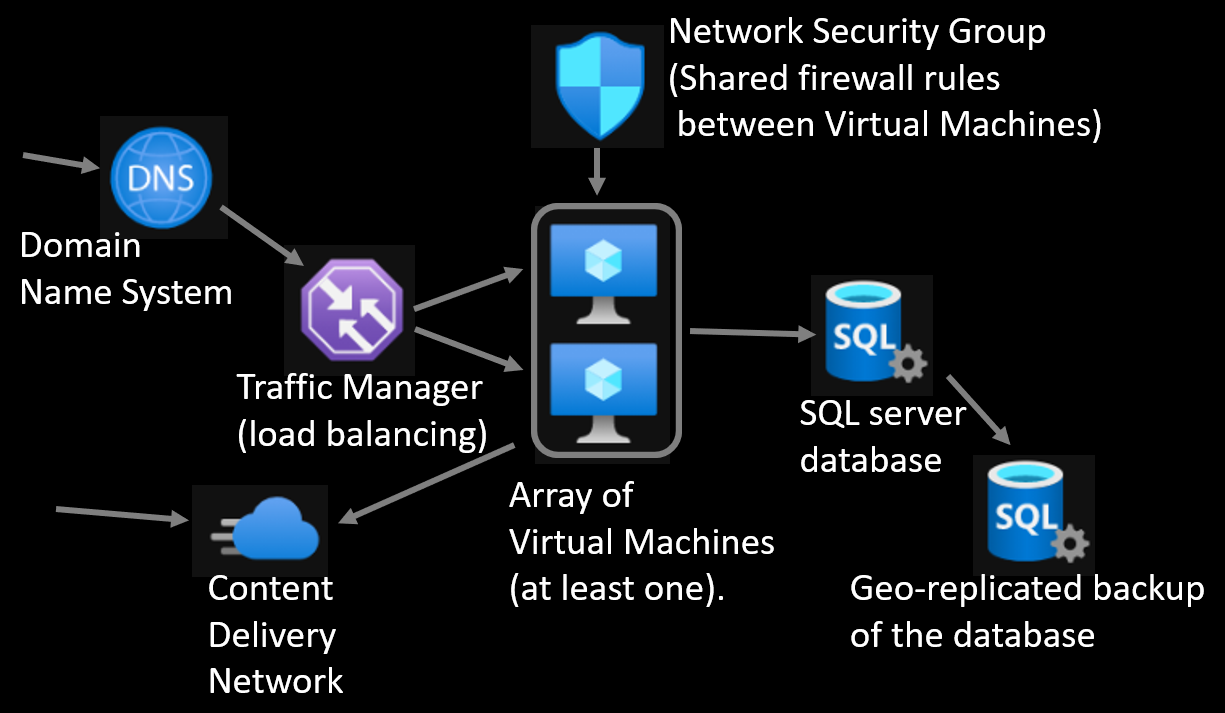
Virtual Machine will be created as a list with a shared Network Security Group (NSG). This allows you to configure the firewall rules once and apply them to all your machines.
Next, replace the // Todo: Insert VM code with:
    let nsgName = $"myNSG{deployEnvironment}"
    let vmNamePrefix, vmCount = $"MyVm{deployEnvironment}", 1
    let vmUsername = "MyAdmin"
    let vmPassword = Environment.environVarOrFail $"vm-password-{envInfo}"
    let vmHttpPorts = [443]

    /// Open http ports
    let httpsRule = securityRule {
        name $"{vmNamePrefix}HttpsRule"
        services (vmHttpPorts |> List.map(fun p -> NetworkService ("http", uint16 p |> Port)))
        add_source_tag NetworkProtocol.TCP "Internet"
        add_destination_any
    }

    /// Open https port
    let httpRule = securityRule {
        name $"{vmNamePrefix}HttpRule"
        services [NetworkService ("http", uint16 80 |> Port)]
        add_source_tag NetworkProtocol.TCP "Internet"
        add_destination_any
    }

    /// Allowed ports for VM:
    let vmIpRules = // rule name, ip address, allow RDP
        [ "Deployment_Farmer_Ip", getMyIp, true
          // "Office-ip-2021-09-03", "123.123.123.123", false
        ] |> List.map(fun (nm, ip, remote) ->
                securityRule {
                    name nm
                    services (seq {
                        // yield "CustomServicePortToOpen", 12345;
                        if remote then yield "rdp", 3389;
                        })
                    add_source_address NetworkProtocol.TCP ip
                    add_destination_any
                })

    let networkSecurityGroup = nsg {
        name nsgName
        add_rules (httpsRule :: httpRule :: vmIpRules)
    }

    let createVm (vmName:string) =
        vm {
            name vmName
            network_security_group networkSecurityGroup
            username vmUsername
            os_disk 128 Vm.StandardSSD_LRS
            system_identity
            vm_size Vm.VMSize.Standard_DS1_v2
            operating_system Vm.WindowsServer_2019Datacenter
            ip_allocation PublicIpAddress.Static
        }
    let vms = [ 1.. vmCount] |> List.map(fun idx -> createVm($"{vmNamePrefix}{idx}"))
    let vmPwdKeys = [ 1.. vmCount] |> List.map(fun idx -> $"password-for-{vmNamePrefix}{idx}", vmPassword)
You could merge the sqlFirewallRules and vmIpRules, but this depends on your setup.
Relevant Farmer API documentation:
Farmer deployment of the resources
Next, replace the // Todo: Insert Farmer deployment with:
    let deployment = arm {
        location deployLocation
        add_resource database
        add_resource networkSecurityGroup
        add_resources (virtualMachines |> List.map(fun vm -> vm :> IBuilder))
        output "db-connStr" (database.Databases |> Seq.tryHead |> Option.map(fun db -> database.ConnectionString db.Name))
        outputs (virtualMachines
                 |> List.filter (fun vm -> vm.PublicIpAddress.IsSome)
                 |> List.mapi (fun idx vm -> $"{vmNamePrefix}{idx+1}", vm.PublicIpAddress.Value))
    }

    // To check the ARM generated:
    deployment |> Writer.quickWrite "myTemplate"

    // To check the changes in Azure:
    //let changes = deployment |> Deploy.whatIf deployName ([dbPasswordKey, dbPassword] @ vmPwdKeys)
    //System.IO.File.WriteAllText(@"Changes.txt", changes)

    //let outputs = Map.empty<string,string>
    let outputs =
        deployment
        |> Deploy.execute
            deployName
            ([dbPasswordKey, dbPassword] @ vmPwdKeys)

    Console.ForegroundColor <- ConsoleColor.Blue
    if outputs.ContainsKey "db-connStr" then
        let connStr = outputs.["db-connStr"]
        dbConnectionString <- connStr.Replace("=tcp:", "=")

    virtualMachines |> List.iteri(fun idx _ ->
        if outputs.ContainsKey $"vmIP{idx+1}" then
            Console.WriteLine ($"VM{idx+1} IP: " + outputs.[$"vmIP{idx+1}"])
            createRemoteDesktopFile $"{vmNamePrefix}{idx+1}" outputs.[$"vmIP{idx+1}"] vmUsername
    )
    Console.ResetColor()
Before you can run this script, you have to set the environment variables of passwords for VM and DB.
The complexity rules for VM-password: Supplied password must be between 8-123 characters long and must satisfy at least 3 of password complexity requirements from the following:
- Contains an uppercase character
- Contains a lowercase character
- Contains a numeric digit
- Contains a special character
- Control characters are not allowed
To set environment variables you can do e.g.:
set vm-password-test=...
set db-password-test=...
Because the deployments are repeatable, you can already dotnet build and dotnet run the script.
Deploying the Database Schema
A typical way to store, version-control, manage and compare Microsoft SQL Server database schemas is the SQL Server Data Tools (SSDT). Given a connection string, SSDT will create a local snapshot of a database, copying all of the tables, views, stored procedures, etc. into your source code repository as .sql-files. The .sql-files will be in a “.sqlproj” project that is compiled into a .dacpac-file.
You can get SSDT for Visual Studio 2019 or Azure Data Studio via the SQL Database Projects Extension.
For non-Windows machines, you can build a dacpac file by creating a normal .fsproj class library, and changing it to use Sdk <Project Sdk="MSBuild.Sdk.SqlProj/1.16.2"> as described in here with more details.
Farmer has deployed an empty database for you (or updated the existing settings), but now you would want to insert/update the database schema, tables, procedures, etc.
A way to install the dacpac-file to created database (or do a schema comparison), is using FAKE.
Let’s replace the part // Todo: Deploy database code with:
    // You need the .dacpac file:
    let dacPacPath = System.IO.Path.Combine [|__SOURCE_DIRECTORY__ ;"find_your_dacpac_file_path" ; "database.dacpac" |]
    if not (System.IO.File.Exists dacPacPath) then
        failwithf "DacPac file not found: %s" dacPacPath
    else

    let connectionString =
        let conn = dbConnectionString
        if conn.StartsWith "\"" && conn.EndsWith "\"" then
            conn.Substring(1, conn.Length-2)
        else conn

    printfn "Deploying db connection: %s" connectionString

    // Example of custom parameters for SQLPROJ deployment:
    // let demodata = if deployEnvironment = "Test" then "True" else "False"

    SqlPackage.deployDb (fun args ->
        { args with
            //Action = SqlPackage.DeployAction.Report "database-diff.xml" //This would only show diff. The default action: Deploy
            Source = dacPacPath;
            Destination = connectionString
            // Variables = [ "DeployDemoData", demodata ]
            AdditionalSqlPackageProperties = [
                "IgnorePermissions", "true"
                "IgnoreUserSettingsObjects", "true"
                "IgnoreLoginSids", "true"
                "IgnoreRoleMembership", "true"
                // Depending on your dacpac, you might want to exclude some objects:
                "ExcludeObjectTypes", "Users;Logins;RoleMembership;ServerRoleMembership;Permissions";
            ]
            Timeout = Some 240
        }) |> ignore
What next?
There is a Todo: More resources will follow here... for you to continue infrastructure development with Farmer.
Other resources that are useful:
- Application Insights, to attach monitoring: alerts, dashboards, availability tests.
    let ai = appInsights {
        name $"{deployName}{deployEnvironment}AppInsights"
    }
- Azure Traffic Manager is a DNS-based traffic load balancer. It means you can route the traffic to globally different regions and there is no performance hit of the traditional load balancer routing the traffic. The traffic manager will route the traffic to your VMs.
    let dependsOnIps =
        virtualMachines
        |> List.filter(fun vm -> vm.PublicIpId.IsSome)
        |> List.map(fun vm -> vm.PublicIpId.Value)
    let trafficMgr = trafficManager {
        name $"TrafficManager2392{deployEnvironment}" // has to be unique name
        depends_on dependsOnIps
        depends_on (virtualMachines |> List.map(fun vm -> vm :> IBuilder))
        add_endpoints
            (virtualMachines
             |> List.filter(fun vm -> vm.PublicIpAddress.IsSome)
             |> List.mapi(fun i (vm) ->
                TrafficManager.endpoint {
                    name vm.Name
                    weight 1
                    priority (i+1)
                    target_external (vm.PublicIpAddress.Value.Eval()) deployLocation
                }))
        enable_traffic_view
        routing_method RoutingMethod.Priority // Set your routing method here
        dns_ttl 60<Seconds>
        monitor_protocol Https
        monitor_port 443
    }
- Azure DNS: The benefit of Azure DNS comes when you want to have a version history of your domain name settings, you want to programmatically manage the DNS to e.g. automatically verify SSL-certifiaction renewal, and route the traffic to Azure Traffic Manager.
    let dnsZoneName = "mydomain321.com" // Your domain here
    let dns = dnsZone {
        name dnsZoneName
        zone_type Dns.Public
        depends_on trafficMgr
        add_records [
            txtRecord {
                ttl 3600
                add_values [
                    // Check your current domain with: nslookup -type=txt mydomain.com
                    //"asdf=1234"
                ]
            }
            //cnameRecord {
            //    name "subsite"
            //    ttl 3600
            //    cname "www.internet.com"
            //}
            // add mx and cname records from your current DNS...
            yield!
              [ ""; "de"; "es"; "fr"; "www" ]
                  |> List.fold(fun gathered nm ->
                     if nm = "" then
                        aRecord {
                            ttl 60
                            link_to_dns_zone (Arm.Dns.zones.resourceId dnsZoneName)
                            target_resource trafficMgr
                        } :: gathered
                     else
                        cnameRecord {
                          name nm
                          depends_on (gathered |> List.head)
                          link_to_dns_zone (Arm.Dns.zones.resourceId dnsZoneName)
                          ttl 3600
                          target_resource trafficMgr
                        } :: gathered) []
        ]
    }
- Azure CDN will mirror your public static files to a global fast content delivery network. If you reference the files from that, you will get faster delivery and release some resources from your server(s)/VM(s).
    let contentDelivery = cdn {
        name $"{deployName}{deployEnvironment}Cdn"
        sku Cdn.Sku.Standard_Verizon
        add_endpoints [
            endpoint {
                name (dnsZoneName.Replace(".com", "com").Replace(".","-"))
                // add_compressed_content [ "text/plain"; ... ] // Custom mime-types
                enable_http
                enable_https
                query_string_caching_behaviour Cdn.QueryStringCachingBehaviour.IgnoreQueryString
                optimise_for Cdn.GeneralWebDelivery
                origin dnsZoneName
            }
        ]
    }
After adding these, you have to modify the deployment, e.g.:
    let deployment = arm {
        location deployLocation
        add_resource ai // added
        add_resource contentDelivery //added
        add_resource dns //added
        add_resource trafficMgr //added
        add_resource database
        add_resource networkSecurityGroup
        add_resources (virtualMachines |> List.map(fun vm -> vm :> IBuilder))
        output "db-connStr" (database.Databases |> Seq.tryHead |> Option.map(fun db -> database.ConnectionString db.Name))
        outputs (virtualMachines
                 |> List.filter (fun vm -> vm.PublicIpAddress.IsSome)
                 |> List.mapi (fun idx vm -> $"{vmNamePrefix}{idx+1}", vm.PublicIpAddress.Value))
        output "appInsights-InstrumentationKey" ai.InstrumentationKey //added, outputs.["appInsights-InstrumentationKey"], you need this to send events to AI
        output "dns-nameServers" dns.NameServers //added, outputs.["dns-nameServers"], you need these to register your domain.
    }
Supporting resources
Relevant Farmer API documentation:
Connecting the VMs
If you want to manually connect VMs, this script already created remote desktop connection files for you.
If you want to automatically run scripts in VMs, you can do it e.g. with Invoke-AzVMRunCommand,
but you need to have Azure Cli installed and connected (powershell -ExecutionPolicy Unrestricted -Command "Connect-AzAccount -Force):
    let runShell = fun (command, args) ->
        try
            let P = System.Diagnostics.Process.Start(command, (args : string))
            if (P = null) then (
                printf "\r\n\r\nFailed: %s\r\n" command
            )
            P.WaitForExit();
            if P.ExitCode <> 0 then failwith ("Command failed, try running manually: " + command + " " + args)
        with
        | :? System.ComponentModel.Win32Exception ->
            printf "\r\n\r\nFailed: %s\r\n" command
            reraise ()

    Console.WriteLine ("VM installation started at " + DateTime.Now.ToLongTimeString())
    Console.ForegroundColor <- ConsoleColor.DarkGray
    virtualMachines
    |> List.iter (fun (vm) ->
        Console.WriteLine ($"Installing VM: {vm.Name.Value} " + DateTime.Now.ToLongTimeString())
        let installVMCmd =
            "Set-ExecutionPolicy -ExecutionPolicy Unrestricted -Scope Process; Install-Module -Name Az.Compute " +
            "-Scope CurrentUser -Force -AllowClobber; Import-Module Az.Compute;" +
            $"Invoke-AzVMRunCommand -ResourceGroupName '{deployName}' -Name '{vm.Name.Value}' " +
            "-CommandId 'RunPowerShellScript' -ScriptPath './installStuff.ps1' -Parameter @{{myScriptParam1='hello';myScriptParam2='hello2'}}"

        Console.ForegroundColor <- ConsoleColor.DarkGray
        runShell("powershell",$"-ExecutionPolicy Unrestricted -Command \"{installVMCmd}\"")
    )
    Console.ResetColor()
    Console.WriteLine ("VM installation complete at " + DateTime.Now.ToLongTimeString())
You have the installStuff.ps1 locally, and then Invoke-AzVMRunCommand will transfer it to the VM automatically and execute the commands.
The path it transfers the script will be something like C:\Packages\Plugins\Microsoft.CPlat.Core.RunCommandWindows\(version)\Downloads\script0.ps1.
Example of the file content that you could have in your installStuff.ps1:
# Do whatever installations here...
# Some parameters:
param ($myScriptParam1, $myScriptParam2)
# Some variables:
$httpPortToOpen = 80
$httpsPortsToOpen = 443,12345

# Save current directory
pushd

# Install Nuget
Install-PackageProvider -Name NuGet -MinimumVersion 2.8.5.201 -Force

#Show file extensions
reg add HKCU\Software\Microsoft\Windows\CurrentVersion\Explorer\Advanced /v HideFileExt /t REG_DWORD /d 0 /f

#Install chocolatey
iex ((new-object net.webclient).DownloadString('https://chocolatey.org/install.ps1'))

#Install dotnet
cd ${Env:ALLUSERSPROFILE}\chocolatey\bin
.\choco.exe install dotnet -y

#Go back to original directory
Pop-Location

#Open Windows firewall ports
netsh advfirewall firewall add rule name="Open Port HTTP $httpPortToOpen" dir=in action=allow protocol=TCP localport=$httpPortToOpen
Foreach ($httpPortToOpen in $httpPortsToOpen)
{
    netsh advfirewall firewall add rule name="Open Port HTTPS $httpsPortToOpen" dir=in action=allow protocol=TCP localport=$httpsPortToOpen
}
#...and so on...
Keep the security in mind when installing stuff to your VMs. Happy managing!